The user list
Open User Administration and click Users.
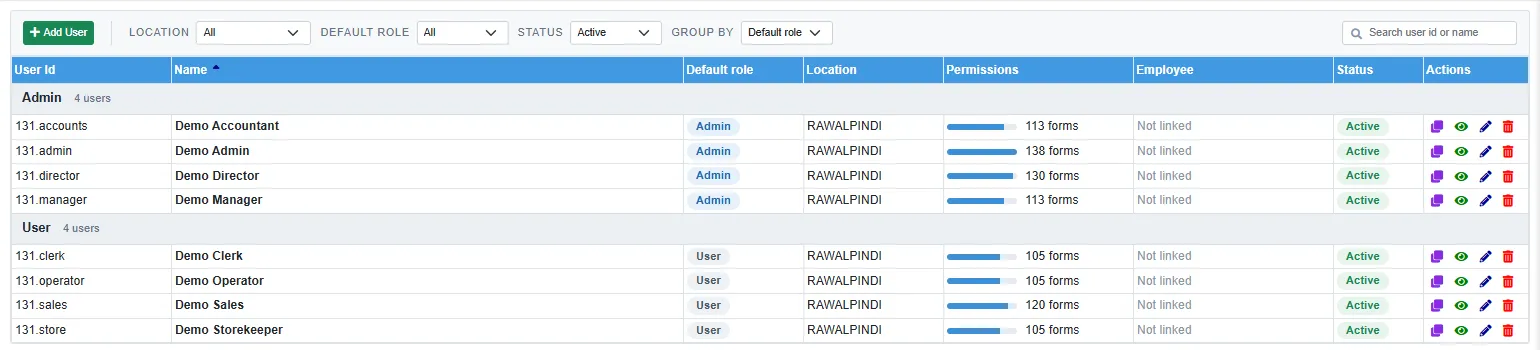
Each row is one login: the User Id, the name, the Default role, the Location, the Permissions (how many forms the user has, with a bar compared with the user who has the most), the linked Employee and the Status.
- Location, Default role and Status narrow the list. It opens on Active users.
- Group by groups the rows by default role, by location, or not at all.
- The search box finds a user id or a name.
On a row, Clone starts a new user with the same location, default role and permissions (you type a new id, name and password), View opens it read-only, Edit opens it for changes and Delete removes the login. Double-click a row to open it.
Add a user
- Click the green Add User.
- Fill the Account card.
- Choose a Default role and click Generate to fill the permissions. See Default role and Generate below.
- Check the permissions, then click Save on the bar at the top.

| Field | What to enter |
|---|---|
| User Id | Required, 2 to 15 characters. Spaces are removed and the company number is put in front, so ali is saved as 131.ali. The hint under the box shows it. The user types this full id to log in. It cannot be changed after saving. |
| User name | The person's name. The button beside it picks an employee: the name, location and the Employee card (PNO, designation, department and photo) are then filled from the employee record. |
| Location | The location the user works at. |
| Status | Active. Clear it to stop the user logging in. |
| Password, Confirm password | Required for a new user, at least 2 characters. The two must match, or you get Password and confirm password are not the same. |
On save, the user also gets a role of their own, named after them (for example Demo New User Role). It holds the permissions and shows in the User roles card.
Default role and Generate
The Default role is a starting point for the permissions:
| Default role | Generate gives |
|---|---|
| Admin | Every form, with Add, Edit, Delete and the line permissions. Also Company, Locations and Stock Rooms, which only an administrator gets. |
| Supervisor | Every form except the administrator's, with Add, Edit, Add Line and Edit Line, but no deleting. |
| User | Every form except the administrator's, with Add and Add Line only. |
Generate works when you add a user (not on a clone). It replaces the permissions table with the full list for that role. Then remove what the person should not have, and untick what they should not do.
Reset, Clone User and the delete button in the User roles card do nothing yet. To start from another user's permissions, use Clone on that user's row in the list.
Permissions

The table lists every form the user may open, grouped by module. A form that is not in the table does not show on the user's menu. For each form, the boxes say what the user may do:
| Box | Allows |
|---|---|
| Add, Edit, Delete | Adding a document or row, changing it, deleting it. Without them the buttons are greyed out and the user can only view. |
| Add Line, Edit Line, Delete Line | The same for the lines inside a document, for example the items of an order. |
| Account, Amount | Kept for screens that limit changing an account or an amount. No screen uses them at present. |
- Module, Type (Transaction, Setup or Report) and the search box narrow the table.
- Tick the box in a column header to set that permission for every form shown. With a filter on, it changes only the forms you see.
- The bin on a row takes the form away. On an existing user the row is crossed out until you save; the undo arrow keeps it.
- On an existing user, a line above the table counts your changes, for example 3 added · 1 to remove · saved on Update.
A user sees the change the next time they open the module or the screen.
Add forms
Click Add Forms to give the user more forms.
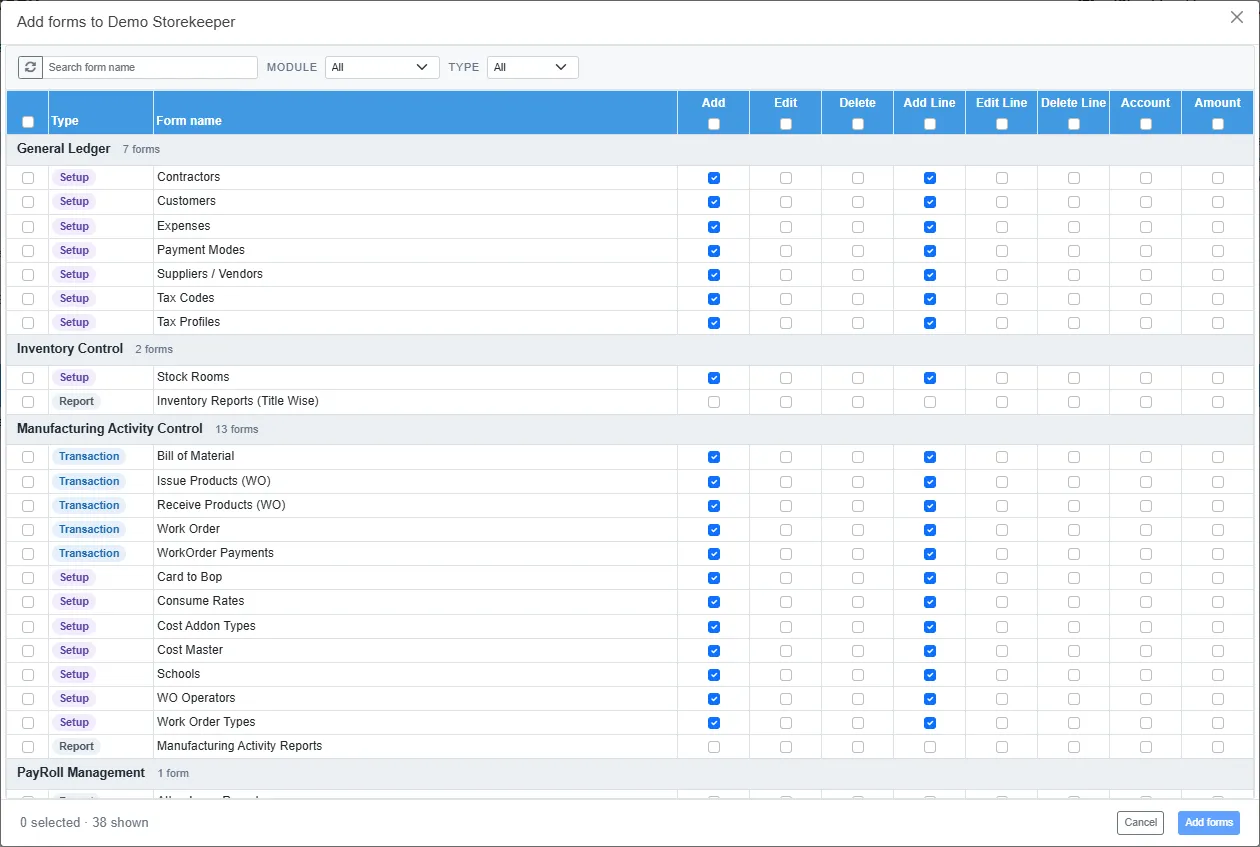
The list shows the forms the user does not have yet, with suggested permissions. Tick the box at the start of each form you want (the header box ticks every form shown), change the permissions if needed and click Add forms. The new rows show with a new tag until you save.
Change a password
Open the user with Edit, type the New password and the Confirm password, and click Update. Leave both boxes empty to keep the current password. Users can also change their own password from Reset Password in the user menu. See The screen layout.
Switch a user off or delete one
- To stop someone logging in but keep the login, open it and clear Active. Set the list's Status to Inactive or All to see such users.
- Delete on a row removes the login, after you confirm. The documents the user made are kept.